Autocad 2019 2d Drawing Elevations Around a Plan
This is a classic issue with AutoCAD drawing: Sometimes you accidentally draw with elevation in your 2D drawing. The probable cause is because you snap to an existing object with elevation. But we never know, why the objects have Z value in the first place anyway.
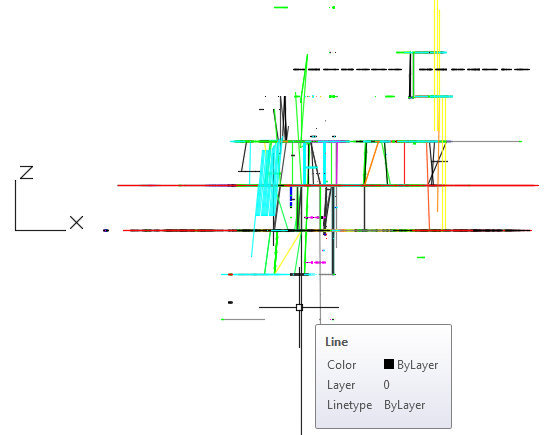
If you rotate the drawing and see it from an elevation view, you will see the objects has elevations. This is a 2D drawing, so it's not supposed to look like this.
There is a suggestion to use FLATTEN command to fix it. But it never works well for this issue.
Before you continue, create a backup of your drawing!
Using AutoLISP program
My recommended tool for this problem is by using ALLFLAT by Lee Mac. You can find the code in CADtutor forum here. If you are not familiar with using AutoLISP program,
If you are not familiar with using AutoLISP program, read how you can save the code and use it here. Lee Mac has many useful LISP program. This program is very simple and works very quickly.
However, because this program is very simple and not developed further, there are some minor issues with rotated blocks and hatches. If you want to try another solution, try SUPERFLATTEN by Joe Burke. The problem with SUPERFLATTEN is it doesn't work with dimensions and OLE object.
Dimensions are a bit tricky because they don't have elevation. If you use Associative Dimension, then you will be okay. The dimension will follow the objects. The problem is when the dimension is not associated with any object.
You may want to try them both and see which one works well for you.
Manually Fix the Drawing
If you use AutoCAD LT or AutoLISP doesn't work for your drawing, you can try to fix it manually. It's not difficult but takes some time.
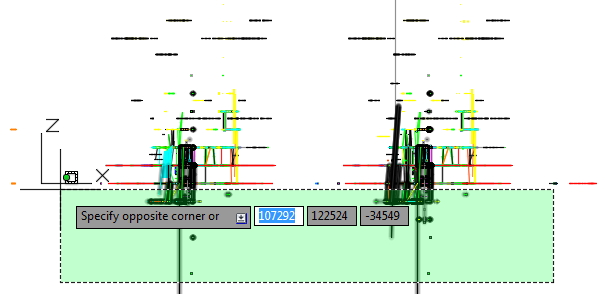
Select all objects. Or you can select only objects that have elevations from elevation view. For a very complex drawing, you may want to do this gradually. Selecting all objects at once can make your computer slow or crash.
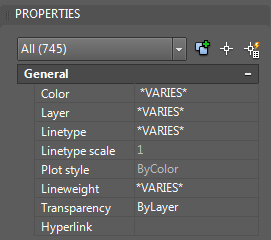
We need to change the Z value for our objects to 0 (zero). Open Properties Palette.
Because we select multiple types of objects, we will not see the Z or elevation properties here.
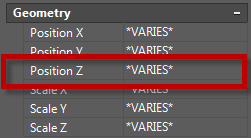
Click the object drop-down list. Select an object type, except for dimensions and hatches. We can ignore them because they don't have elevation.
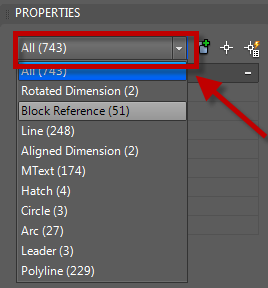
The elevation field is named differently. For example, blocks elevation is defined by Position Z. Change the Position Z value to 0.
Repeat the procedure for other object types.
Here are several fields that control the elevation.
- Lines elevation are defined by Start Z and End Z
- Polylines elevation are defined by Elevation
- Arc, Circle, and Ellipse elevation are defined by Center Z
- etc.
The real challenge is when you have blocks with the objects inside it have different Z value. You will need to open each block in block editor and change the Z value using the procedure above.
I know this can be a tedious task. But if you need to continue working on this drawing, I suggest you fix it. The problem won't just go away; it would be harder to work with it when it gets more complicated!
Preventing this Issue
If you only with 2D drawing, it is a good idea to set Object Snap to ignore Z value. It will not fix existing drawing, but at least you will not having a bigger problem.
You can set it in AutoCAD options, Drafting Tab. CheckReplace Z value with current elevation.

If you prefer to change System Variable from the command line, it is saved in OSNAPZ variable.
It's a good idea to add this variable in System Variable Monitor, so when the variable changed you will know it immediately. Yes, sometimes the variables are changed in a mysterious way.
If you are adventurous, you can add the default System Variable in acad.lsp or acaddoc.lsp. It will make sure the variable is set when you start AutoCAD.
Source: https://www.cad-notes.com/fix-autocad-drawing-thats-accidentally-has-z-value/
0 Response to "Autocad 2019 2d Drawing Elevations Around a Plan"
Post a Comment